Software Design Patterns - Creational Patterns
The creational patterns are: Factory Method, Abstract Factory, Builder, Prototype, and Singleton.
Factory Method
The Factory Method pattern is a way of declaring a method in the parent class and instantiating the object in a subclass. In C++ it is usually expressed with virtual functions; in other languages such as Java, with abstract methods.
The Factory Method pattern focuses on the target "product" itself, and generally uses a common interface to instantiate an object's properties.
Take a graphics-drawing application as an example. For the parent class we only care about the high-level requirement (drawing a shape); here that corresponds to a graphic. The structure is as follows:
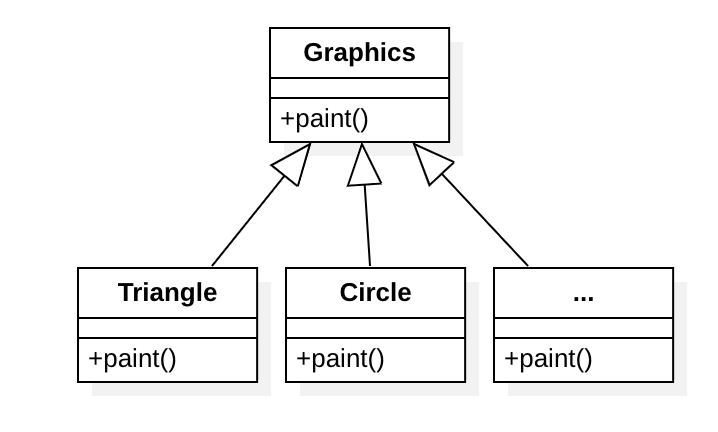
The definition looks like this:
class Graphics {
    // Abstract base class
protected:
    virtual void paint() = 0;
};
The parent class (the graphics class) is an abstract high-level class. To draw different concrete shapes, we can define:
class Triangle : public Graphics {
    // Class that draws a triangle
protected:
    void paint() override {
        // TODO: draw triangle
    }
};

class Circle : public Graphics {
    // Class that draws a circle
protected:
    void paint() override {
        // TODO: draw circle
    }
};
Now, to draw a circle, we just declare a Circle object and call the common paint() to draw it. Every other shape works the same way. This greatly reduces the cost of understanding: we only need to focus on the "product" (the circle, Circle).
Abstract Factory
Abstract Factory is a way to create objects without specifying the concrete class to instantiate. It focuses on the different "styles" of constructing objects, and one factory typically constructs more than one kind of "product".
Continuing with the drawing example above, suppose we now want to draw shapes in special styles: some with a brush, some with a pencil, some with pastels, or with a blender. The structure is as follows:
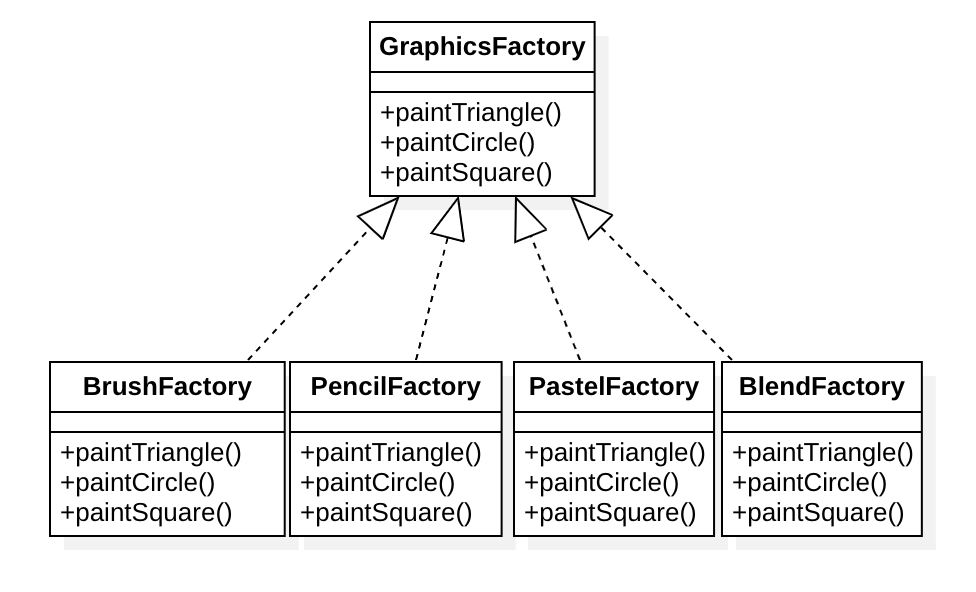
Four drawing factories are defined here, one per style. Each factory uses a common interface to draw different shapes (it can construct three different "products").
The code is defined as follows:
class GraphicsFactory {
    // Base class
protected:
    virtual void paintTriangle() = 0;
    virtual void paintCircle() = 0;
    virtual void paintSquare() = 0;
};

class BrushFactory {
    // Brush drawing factory
protected:
    void paintTriangle() override {
        // TODO: draw triangle
    }
    void paintCircle() override {
        // TODO: draw circle
    }
    void paintSquare() override {
        // TODO: draw square
    }
};

class PencilFactory {
    // Pencil drawing factory
protected:
    void paintTriangle() override {
        // TODO: draw triangle
    }
    void paintCircle() override {
        // TODO: draw circle
    }
    void paintSquare() override {
        // TODO: draw square
    }
};

class PastelFactory {
    // Pastel drawing factory
protected:
    void paintTriangle() override {
        // TODO: draw triangle
    }
    void paintCircle() override {
        // TODO: draw circle
    }
    void paintSquare() override {
        // TODO: draw square
    }
};

class BlendFactory {
    // Blender drawing factory
protected:
    void paintTriangle() override {
        // TODO: draw triangle
    }
    void paintCircle() override {
        // TODO: draw circle
    }
    void paintSquare() override {
        // TODO: draw square
    }
};
Now, to draw a triangle in pencil style, we no longer need to care about a triangle class; the same goes for the others.
PencilFactory pFactory;
pFactory.paintTriangle(); // pencil draws triangle
pFactory.paintCircle(); // pencil draws circle
BrushFactory bFactory;
bFactory.paintCircle(); // brush draws circle
bFactory.paintSquare(); // brush draws square
Builder
The Builder pattern is a way to create complex objects step by step. It lets us flexibly customize how each part of an object is created.
With a builder, you call various interfaces one after another to perform specific initialization and set the object's properties. Once initialization is done, you call a build function (build()) to produce the target object.
Using drawing as the example:
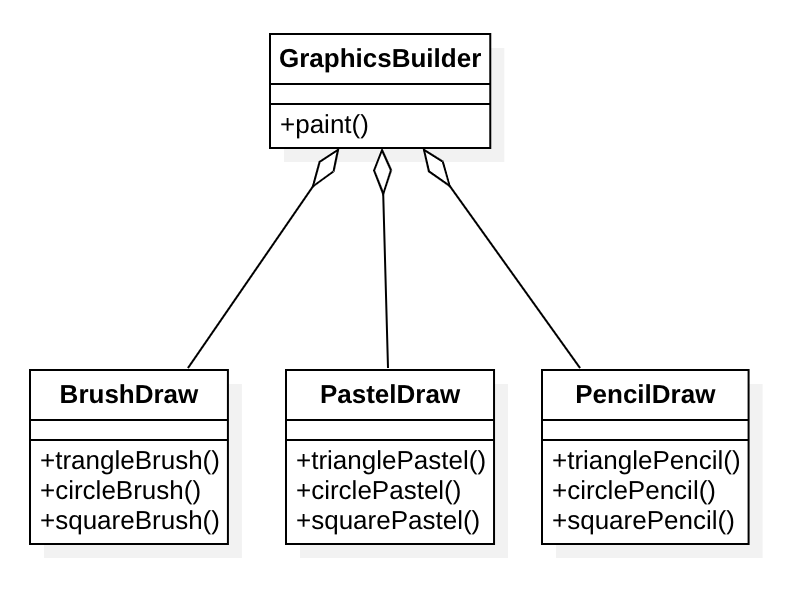
Three drawing styles are defined here. With the builder, you only initialize the shapes in the styles you want, then call the build interface (paint()) to draw the target picture.
The code is as follows:
class Builder {
    Builder& triangleBrush() {
        // TODO: add brush-drawn triangle
        return *this;
    }
    Builder& circleBrush() {
        // TODO: add brush-drawn circle
        return *this;
    }
    Builder& squareBrush() {
        // TODO: add brush-drawn square
        return *this;
    }

    Builder& trianglePencil() {
        // TODO: add pencil-drawn triangle
        return *this;
    }
    Builder& circlePencil() {
        // TODO: add pencil-drawn circle
        return *this;
    }
    Builder& squarePencil() {
        // TODO: add pencil-drawn square
        return *this;
    }

    Builder& trianglePastel() {
        // TODO: add pastel-drawn triangle
        return *this;
    }
    Builder& circlePastel() {
        // TODO: add pastel-drawn circle
        return *this;
    }
    Builder& squarePastel() {
        // TODO: add pastel-drawn square
        return *this;
    }

    void paint() {
        // TODO: build/render function
    }
};
To draw a complex picture with the Builder pattern, you can do this:
Builder builder;
builder.circlePastel() // initialize circle
       .squareBrush() // initialize square
       .trianglePencil() // initialize triangle
       .paint() // build
Prototype
Normally, objects are obtained from a class definition. But if we don't know the class and just want to clone a new object from an existing object, carrying over some of its properties, that approach is the Prototype pattern.
Note that cloning hides the complex details of the class. A clone can copy public methods and fields as well as protected or private ones, so that it reproduces the original object's properties as fully as possible.
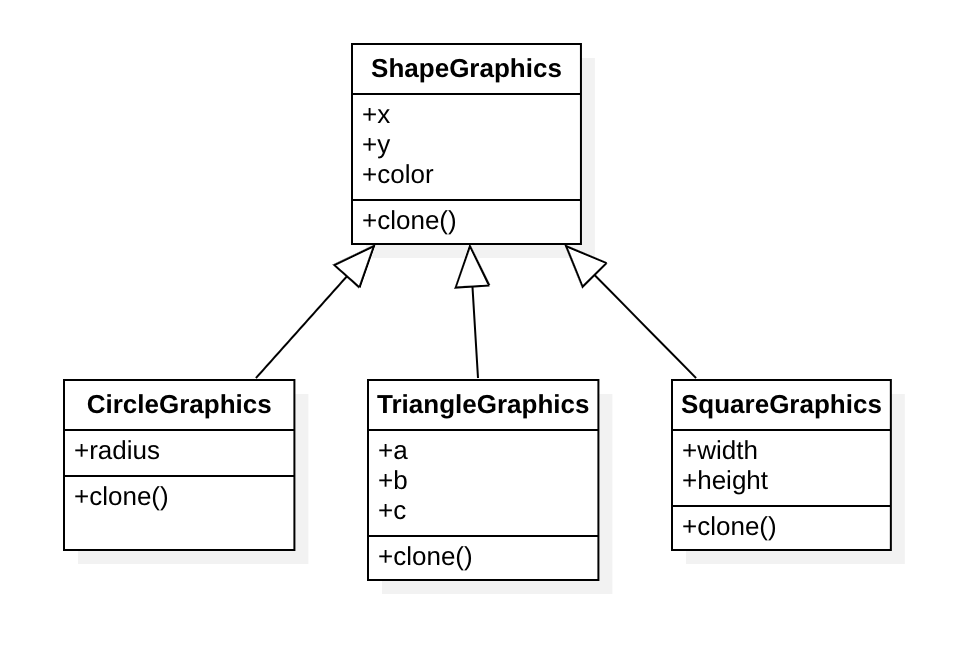
Example code:
class ShapeGraphics {
    // Shape
public:
    ShapeGraphics() : mX(0), mY(0), mColor(0) {}
    ShapeGraphics(int x, int y, int cr)
        : mX(x), mY(y), mColor(cr)
    {}
    ShapeGraphics(const ShapeGraphics& shape) {
        this->mX = shape.mX;
        this->mY = shape.mY;
        this->mColor = shape.mColor;
    }
    virtual ShapeGraphics* clone() = 0;
private:
    int mX, mY, mColor;
};

class CircleGraphics : public ShapeGraphics {
    // Circle
public:
    CircleGraphics(const CircleGraphics& source)
        : ShapeGraphics(source)
    {
        this.mRadius = source.mRadius;
    }
    ShapeGraphics* clone() {
        return new CircleGraphics(*this);
    }
private:
    int mRadius;
};

class TriangleGraphics : public ShapeGraphics {
    // Triangle
public:
    TriangleGraphics(const TriangleGraphics& source)
        : ShapeGraphics(source)
    {
        this->mA = source.mA;
        this->mB = source.mB;
        this->mC = source.mC;
    }
    ShapeGraphics* clone() {
        return new TriangleGraphics(*this);
    }
private:
    int mA, mB, mC;
};

class SquareGraphics : public ShapeGraphics {
    // Square
public:
    SquareGraphics(const SquareGraphics& source)
        : ShapeGraphics(source)
    {
        this->mWidth = source.mWidth;
        this->mHeight = source.mHeight;
    }
    ShapeGraphics* clone() {
        return new SquareGraphics(*this);
    }
private:
    int mWidth, mHeight;
};
Constructing objects with the Prototype pattern looks like this:
class CustomShape : public ShapeGraphics {
    CustomShape() : ShapeGraphics(10, 10, 0xff00) {}
    ShapeGraphics* clone() {
        return new CustomShape(*this);
    }
};

CustomShape shape; // position (10, 10), color 0xff00
auto newshape = shape.clone(); // clone the shape
SquareGraphics square(*newshape); // construct an object from the cloned newshape attributes
auto newsquare = square.clone(); // new cloned square with square attributes
Singleton
A singleton is a special construction pattern: the object it constructs has only one global instance at runtime.
Singletons are typically used for central control and centralized configuration, ensuring consistency of information and of control.
Example code:
class Singleton {
    // Singleton
public:
    static Singleton& getInstance() {
        // declare a function-local static instance
        static Singleton inst;
        return inst;
    }
private:
    Singleton() {}
};
This defines a singleton class. It cannot be instantiated through the class directly; instead, a static variable and a static function provide access to the object.
Usage:
auto inst = Singleton::getInstance(); // get the singleton instance